SCROLL DOWN for the blog post or
FILTER BY TOPIC by clicking on one of the following buttons
FILTER BY TOPIC by clicking on one of the following buttons
 How to pitch your lessons correctlyI am currently learning a new language – but this new language also comes with a new alphabet! Having bought a flat in Crete 10 years ago, it has become more and more imperative that I can speak more than the usual holiday language that most of us pick up when we travel. ‘Good morning. How are you? Can I have a beer please?’ These are the phrases I have been carrying for several years now, without moving forward. So, I have a small sphere of reference, a desire to learn – and a smattering of words at my finger-tips.
When Stella started teaching me Greek a month ago, I realised very quickly that this would take some time! However, I have an advantage: the biggest difference between learning now, and when I last learnt a new language (at school) is that I have a good understanding of how we learn effectively! So, with each activity, each piece of homework, each time I get something right – or wrong – another part of my brain is analysing what I need to do next to embed the new knowledge. Let me be more specific. I am an avid reader, but also a busy person, so I have learnt to scan texts. I am aware of this – but didn’t realise how I would now need to read, not just every word, but every letter of every word! ‘Hello’ in Greek is γεια σας. Phonetically, this is pronounced ‘yassas’ It couldn’t look more different to how is sounds! When I translate a sentence from Greek to English, I have to focus on each letter in each word until I have the correct pronunciation – and then I have to translate it into English too. As the sentence is already in a context, in this case meeting and greeting, I can take a good guess at what the next sentence may be. So following the question ‘how are you?’, will probably be something like ‘very well, thank-you’! However, out of context I am relying purely on learning brand new words from scratch. Καλημέρα κυρία Kαστανός (actually says 'Good morning Mrs Brown'!) Imagine that this is how a sentence using key terminology or new vocabulary might look to a student. Their brain has to 'read' the letters, put the sounds together to make the right words, and then work out what they might mean. I would consider myself a bright student – but even so, I need time to take on the new learning. I have started with the following: a desire to learn; ability to sight read; understanding of what sounds certain groups of letters make; confidence to try out sounds; some small sphere of reference to place the words in context - and I have an Greek alphabet sheet next to me so I can refer to it. If there was just one aspect of this list that I was weaker in – including a desire to learn – then it would take much longer and need more support from my teacher. You have up to 30 students who all have different starting points in your class. They all have different rates of learning and understanding, and they all need absolute clarity in your explanations of the new information. And this example was just for reading. When I listen to Stella speak to me, she needs to speak slowly so I can hear the new sounds that I am unused to, work out which of the words I recognise from those I have just been taught, translate the sentence – and work out the reply! On top of that, I need to ensure that the information is stored in my long-term memory and won't disappear as soon as the class is finished. You are delivering a topic to students in your class. There will be concepts and vocabulary that they may not have heard before. Even if you have been studying this topic for the last two weeks, don’t assume that they can remember this and then apply the new knowledge to a different context. Stella spent an hour teaching me the verb ‘to be’. There are different endings depending on whether I want to say ‘I am, you are, he/she/it is, they are’ etc. I then had homework to learn another 5 verbs and their endings. I was very good and did all of my homework! I asked my husband to test me, and was really chuffed that I could remember the new words I had learnt. Next lesson, Stella asked me a question which required me to answer – ‘They are working in Athens.’ I sat for some time, trying to find the words in my brain and eventually said – ‘have we done ‘they’? Fortunately, Stella is a great teacher. She gives me the time I need to find the right place in my brain where the word is sitting, and to put the words together into a sentence. When I tell her that I find a particular thing difficult, she gives me lots of repetitive practice so I can really embed the learning. I can now – after four lessons – construct a paragraph which describes me and my family, where we live and what we do during the day to fill our time. It takes time to plan a lesson structure which enables students to be able to take something new on board, assimilate it, make sense of it, and play it back with understanding! From the teacher, they need time, patience and clarity of expression. The teacher needs to know how much each of them have understood, and what they need next to improve their learning. Granted, I am having one-to-one lessons with Stella – but the concept remains the same. However bright your students are, however great their desire to learn, when any of us is learning something new, we need it to be delivered carefully, patiently, and with the analysis of a good teacher to assess how much we have understood before moving on. καλά διδασκαλία! (Good teaching!)
0 Comments
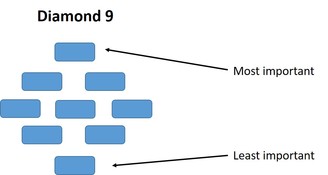
Do you know what progress each of your students is making? Do they? Here are some ideas to demonstrate and measure progress in your classroom. Learning outcomesLook very closely at your learning outcomes and make sure they are bite-sized and achievable. You want to try to make sure the students can start making progress from the beginning of the lesson - not wait until the end! This diagram from Sarah Findlater expresses quite well the areas you should consider: 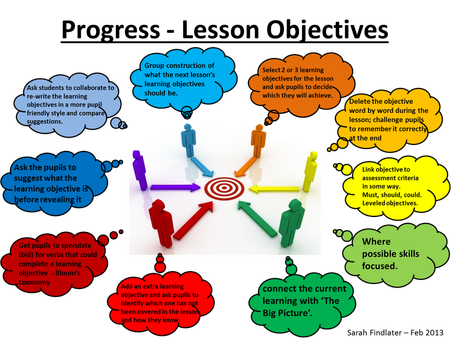 Progress chartsThe progress 'egg' can be used at the start and end of the lesson: 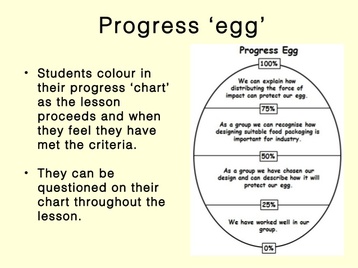 The Plenary Pyramid is a good way to finish the lesson and requires some thought from the students. This is only useful if you read their answers and respond to their needs! 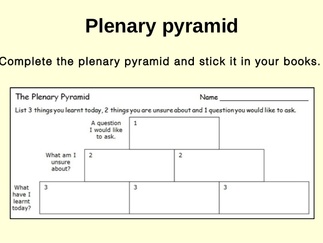 Exit ticketsThere are plenty of these to try... here is an example (more ideas can be found online - just search 'Exit tickets for teaching') 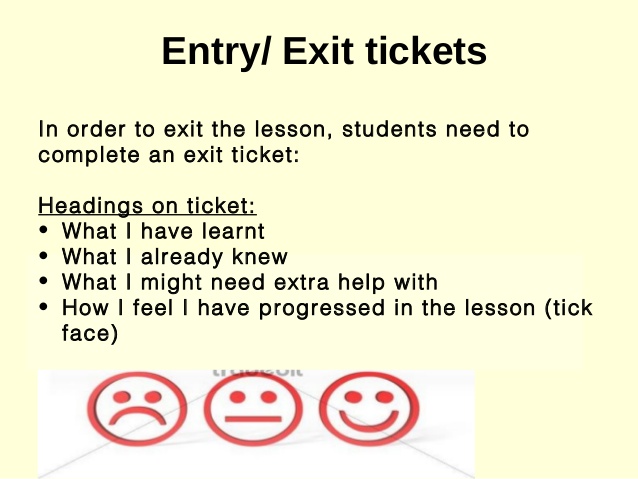 Lolly sticks
Another idea for lolly sticks is for the students to work in pairs discussing a certain topic or question. You can draw a name from the pot and then ask them what their partner's opinion was. This is also good for those who are more wary of joining in in-case their answer is wrong. Mini whiteboards
Post-it notesThere are many ways you can use these. Here are two: 1. Put three statements on the board regarding understanding or confidence -
2. Place large posters around the room, with different attainment levels defined -
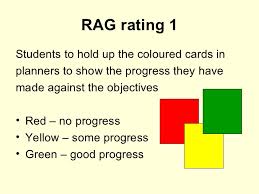
Students put their post-it note with their name on at the point where they are at the beginning of the lesson or topic. At strategic points throughout the lesson (or unit) they move their post-it note according to the progress they have made. Both of these allow the teacher to see at a glance the progress individuals have made. Don’t forget to challenge them occasionally to ensure progress is genuine! Mind mapsAsk students to do a mind map for the unit. Each lesson they add information about what they have just learnt – writing the lesson number next to the information they have added. This shows immediate coverage of topics for each lesson as well as a plan for each lesson of the course. If you want it to show progress, devise a manner in which students can express their confidence level, which they can write or draw against each topic. Here are a couple you might find useful. RAG rating
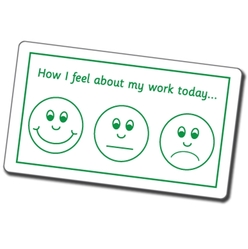
Faces
Thumbs up
Try to make this process a regular part of your teaching. Tasks for you to try, to provide evidence for the standards
Thanks to my colleagues Debbie Dunn and Amy Hagan for their contributions to these tips! How can we demonstrate rapid progress in our lessons?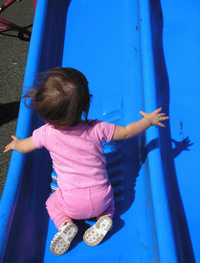 We are constantly being told that all of the students in our classes need to make progress – in fact the ideal is for them to make ‘rapid’ progress. Of course, there does need to be a clear way to make sure we know whether they have learnt something, and our AfL strategies and plenaries should make this learning – progress – very obvious. We would expect progress to be made in every lesson – otherwise what a waste of an hour! And it makes sense that progress can be made from the beginning of the lesson rather than waiting until the end before any learning can take place. The measure of progress needs to be clear
Lesson observations are now more focused on evidence of progress. The information below will also touch, therefore. on how we can demonstrate the progress that is being made. During an observation, the observer must be confident that students have made good or exceptional progress during that time in order to rate the lesson as better than satisfactory. Why do we measure progress?
Students should be part of the process (it's amazing how many teachers forget to share this information with students!) They should know and understand what success will look like each lesson, and they obviously need to know if they have achieved this success! The benefits of effective progress checks
When we are being observed – either as a trainee, an NQT, or an established teacher – the worst thing we can hear in our feedback is that the students did not appear to make progress. It can be frustrating – particularly if we worked hard to plan for this. It is even more annoying if the progress was made in the part of the lesson the observer didn’t see! Let’s look at some of the reasons why this progress may not have been demonstrated clearly enough. An observer might not recognise the progress the students have made because...
What does progress look like?How do we know progress has been made? Progress within a lesson does not always have to be measured in terms of data. It can be as simple as
The key to good progress being made has to come from the partnership between the students and the teacher. Teaching and learning happen together – and progress is the outcome of good teaching and learning! This means an awareness from both parties as to what is expected for success to be possible, and pertinent, individual feedback throughout the lesson to keep the students on track to make that progress. The teacher and student should continuously reflect on progress together, through marking and dialogue, through identifying the next steps in learning and through establishing what particular support or extension work might be required to ensure the student’s individual needs are met. Pupils learn well and show rapid progress when:
Key ingredients to promote rapid progress
In Friday’s blog post I will share some specific tasks and activities to help demonstrate and measure progress – and make it more visible.
How to deal with low level behaviour issues Does this describe your classroom?
These are demonstrations of low level behaviour issues, and in many ways these can be harder to deal with than the bigger displays of poor behaviour. The danger is that we allow it to continue as we may think the students are mainly on task. However when there are any kind of distractions in the classroom, then your students will not be able to make progress. Therefore we need to address low level behaviour issues as soon as they arise. Below I have listed ten areas you could address to make the difference – it may be that you are already doing many of these – but if you are still experiencing any of the behavioural problems listed earlier, then read on and see if there is something extra you could try. Remember - most children want to learn and enjoy learningKeep the following information in mind when you are planning. If students are not learning, then they may switch off and lose interest. STUDENTS RETAIN 10% of what they read 20% of what they hear 30% of what they see 50% of what they see & hear 70% of what they say 90% of what they say & do Effective lesson planning is one of the most important things you can do to prevent behaviour problems from arising!
1. VoiceUse your voice wisely – adjust the volume according to the situation. As the adult in the situation, it is down to you to avoid the event becoming a confrontation. A confrontation can only gather momentum if it involves you; without your input it is only a child behaving badly. Lowering the volume of your response has a far better effect as it will ultimately have the effect of pouring water on a flame. The flame may continue to try to survive, but without oxygen will fade away to nothing!
2. Use the space wellThere is a balance between moving around the classroom too much, and just standing at the front of the class. Speaking from different places in the room will keep the students’ brains alert in the same way as a new activity will revitalise them. When they are working, be sure to wander around the space and check on their contributions. This keeps them on task, allows them to quietly ask you questions about things they didn’t understand, and means you are working with them to achieve their learning aims. NB - If you start doing something else while they are working, like checking your notes or reading emails from your laptop, it has the effect of telling the students you aren’t interested in what they are doing! Not a good way of gaining and maintaining their respect.
3. Distract negative behaviourJust like toddlers who need to be distracted from putting an object into a plug socket (but take no notice of the word ‘No!’) you need to distract your students from negative behaviour. This means attracting them to something else – ultimately the work! Sometimes asking them a question about the topic is far better than a reprimand. This is especially true if they have other things on their mind. Sometimes they have brought baggage in with them which they are finding it difficult to leave at the door. Focusing on that baggage is not always the best solution. Rather, draw their attention to something else if you can. Otherwise a quiet word asking if they could try to focus on the lesson and save the issue to be resolved for later. If this is not possible, there will be processes in your school to deal with an immediate well-being issue such as removing the student to have a chat with their pastoral team.
4. Preparation is keyI have spoken before about how a well-prepared lesson can prevent most difficulties. The times things can go wrong will be when the students are bored waiting for you to find a resource, or to get a video clip to play. Equally, carefully differentiated resources mean all students will be challenged and supported to learn. Have another look at the blog post on differentiation.
5. It's your classroom - who's in charge?Look back at the blog post on behaviour management tips. Keep remembering that it is your classroom, you are the adult – and remain calm and quiet to maintain an excellent learning atmosphere. If you allow any students to get under your skin, you have effectively handed the control to them.
6. Keep calm and teach!Sometimes it is harder to keep calm than others. These are the occasions you need to draw on all your emotional intelligence and pretend! If you don’t feel in control – pretend you are. If the situation feels like it is getting out of control, calmly ask the perpetrator to leave. Tell them you are not prepared to accept their silliness as you need the rest of the class to continue learning. You will find your way with this. Most importantly – don’t let previous situations stay in your mind and flavour the next lesson. Learn and move on!
7. Teaching and learning is the most important thingAll the previous tips have referred to this – you have had more experience at controlling your emotions than the children; you have more to draw on to bring any situation to a good outcome. Remember we are looking at low level disruption here – not the bigger incidents which may require a slightly different approach. But any low-level disruption stops the learning of the students – and this is the main aim of them being in the classroom!
8. Think about what you say and how you say itTry to use positive and reinforcing words as this has a better effect. Sentence starters could be – ‘I noticed that …’; or ‘when you are working well you show a real ability…’; or ‘when you sit quietly and focus you are behaving safely in this lab which is what we need…’
9. Share your expectationsIn the earlier blog post about learning intentions and success criteria, we talk about making sure the students understand what their role is in the lesson, and how they will recognise success. Similarly the students need to understand what your behaviour expectations are.
10. RoutinesSee the previous posts on routines for you and for the students. This makes a huge difference to the way the lessons start and finish. If the students know what you expect with regard to behaviour, then they are more likely to respond appropriately. In your observations, look at those lessons where the learning environment is calm – the students know what to do when they arrive, know how to give books out, know the level of noise that is acceptable and when they have pushed the boundaries too much!
Remember you are also teaching students how to behave. And when the preventative measures don't work...
How questioning and collaborative learning tasks are the key to learning and progress.Can you have a good lesson without questioning? I think the answer is no. Let's examine this further.  The real learning takes place when students talk to each other. High level questioning and collaborative learning activities are a must for a good lesson. There are several ways that students will learn – and make progress – in your lesson. Firstly - what is learning?This is a big question which educationalists have researched, analysed and debated for years. Consequently, there is no one answer – but in essence it is
Most importantly for teachers is how do we ensure learning takes place? Learning for progress has to be information which is embedded. That is, it becomes something which remains in our memory either in the short term or the long term. We need to make sure that new knowledge finds its way into students' long term memory so it can be recalled at a later date for examination purposes! When it comes to planning lessons then, our choice of activity is vital. So how do we plan effectively? Some of this has already been examined in three earlier lesson planning blogs (Learning outcomes; Starters and Plenaries; Differentiation). Here we will look at the impact of certain types of activities on learning. In the chart below I have plotted certain types of activities against the potential for learning of each. Note the role played by the teacher in both lesson preparation and lesson delivery. We need to carefully balance teacher-led activities with those where the students can contribute more fully. Chart examining type of activity and its learning potential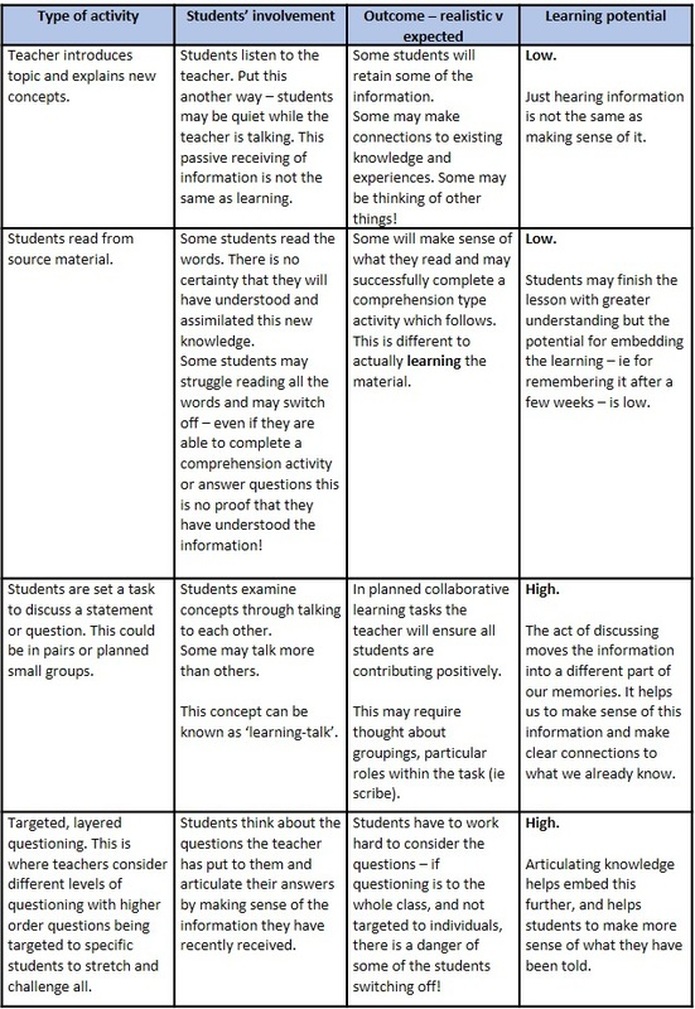 Here's a question for you - if an activity does not lead directly to learning – how long should you spend on it? What percentage of the lesson can afford to be teacher led, if the students are not actually able to make progress during this time? If you only have an hour – should you spend 30 minutes of that hour talking to the class when there is too little learning potential from this alone? Making connections Here's another way of looking at it. Ultimately we want students to have the opportunities to make connections between new information and existing knowledge or experiences. This is what helps us to learn. When you are planning your lessons therefore, consider the amount of teacher input compared to the amount of student input and its relationship to learning potential. The chart below looks at both teacher and student input in relation to learning. Teacher and student input v learning potentialExamine each of the boxes below - remember the aim is to get a balance between teacher and student input - with the aim of ensuring high learning potential. 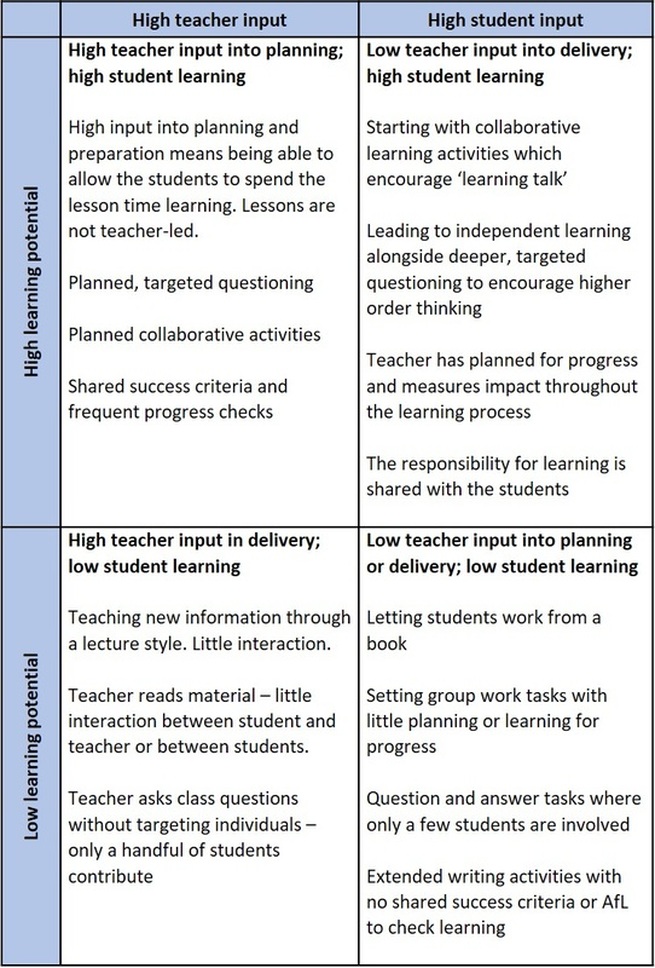 Suggested tasks for your evidence portfolio:
1. When observing others next week, try to examine the percentage of teacher and student input, the types of activity and the learning potential of each. 2. Take a look at one of your earlier planned lessons and see if you can adapt it to enable a greater potential for learning and student input.
Routines for the studentsStudents like routine. That is not to say that there is no place for exciting lesson plans with surprises and discovery. It just means that having basic routines in place lets students know what you expect. This leads to a safe, calm environment where the focus is on learning and nothing else. When students arrive – lining up Your school may have a process in place for this. Whether they do or not, the students are not allowed in the classroom without you (health and safety) so it makes sense for a calm beginning with them lining up outside your room. Before they go in, you have a chance to ensure they are quiet, to check their uniform and to make sure any excitement and chatter has finished before they walk into your ‘learning zone’! Have a seating plan – and stick to it It is good practice to have a seating plan, and many schools insist upon it. Don't feel restricted by this - you can occasionally alter your seating to support learning and behaviour – but having a plan in place, means that the students will come in and know where to sit at all times. It puts the control in your hands, which is a good behaviour strategy. Seating plans work when you are flexible - you may decide that two students don’t work well together and change the plan for the following lesson – and from then on. And if a student tells you they can’t work with someone on their table – listen to them. Check with their tutor later, but giving them the benefit of the doubt at the time will lead to a better lesson than debating it! As a behaviour strategy it works because it doesn't open up an opportunity for debate - it is like a silent strategy! Once in place, you can focus on the learning. If someone is not happy, ask to speak to them after the lesson and discuss the issues then. Seating for learning - You may decide that depending on the style of the tasks, there would be a different seating plan. For instance, you may have a plan for independent working; for group working (sometimes teachers call this working in home groups), for differentiated group working (a one-off where you may sit based on ability) … and so on. NB - If you teach a practical lesson, there are other ways to make sure students can come in ready to work. In my drama lessons for example. the students were used to coming in, putting their bags and coats against one wall, and sitting on chairs in a circle. When students come in have a task laid out as a starter You may have an image or question on the board, or an activity on their desks for example. This allows them to engage with the learning as soon as they are in the door. There won’t be any messing about, carrying on conversations, or asking what they will be doing today. Students bags and books Students should always get their books and necessary equipment out of their bags and on the table, placing their bags under their chairs. This is a health and safety requirement and could cause problems if not part of a clear routine. Check out policies at your school and watch how other teachers do this. (Needs referencing as evidence for your portfolio) Handing in homework How do you collect in their homework? You could:
Find your own way – but
Giving homework and tests back Students will want feedback on their homework. So not only must you mark it, but you need to allocate time for them to see their comments and respond to them. Your school will have a marking policy which will include a process for ‘students’ response to feedback’. Make sure you plan time for this in your lesson! Exiting the room How do your lessons end? This is usually a target for trainee teachers while you are getting used to accurate timing of your lessons! Try to avoid rushing the last task as you run out of time, overlapping the bell and then letting the class go all together – leaving a mess of books and paper on the tables and floor for you to clear up! Planning for how you dismiss the class is as important as the beginning. A good routine may be: Students clear their tables totally and stand / sit behind them so you can see if any aren’t packed away. Then dismiss them a row at a time – usually those who are silent can go first, and those who are chatting go last! Routines make the world of difference both to you and to the students. During your lesson observations, look out for other routines you could benefit from putting in place. If you missed the latest post - check out Routines for you - keeping yourself sane!
 How do routines for you and for the students help maintain a calm atmosphere?Having routines in our work removes some of the pressures and stresses of the ‘not knowing’ what comes next. Although in our everyday lives we may enjoy spontaneity, and there is a lot to be said for the excitement of a new adventure and a surprise evening out, this is not the same in the life of the teacher! No two days in the teacher’s life are the same, and we are often faced with 'crisis management' when something unexpected occurs. So for the rest of the time we need to be sure that clear routines are established - these will keep us sane! The next two posts explore routines for you and for your students. Both are important for different reasons. Today's post - Routines for you. Routines for youWhat time do you arrive to school? You need to ensure you get to school in plenty of time. I always arrive early, make myself a cup of tea, check everything is ready for my day, greet people (and have time for a chat!) and then calmly go to the staff briefing, or my first lesson. People who rush in at the last minute are not setting themselves up for a calm start - and if you are calm and in control, the students respond positively. When do you plan your lessons? Life is very busy as a teacher. In addition to planning and teaching, there is so much more to fill our days. But you know that lessons are a constant. They are always at the same time each week, with the same students and – usually – in the same room. So you can plot on your calendar when you can plan them. I would advise planning in plenty of time for your mentor to look at them first. That way you can make any changes that are recommended. I have worked with some trainees who thought they didn’t need to show their mentor their plans. Suffice to say, the lessons were not as good as they should be – and it took a long time for their practice to improve. When do you plan your resources? Once you have planned your lesson, you will know what resources you need to either create or find. It is advisable to do these early – sometimes your ideas won’t always translate in practice. It is far better to know this early enough to be able to address it! Equally with video extracts or internet clips – make sure you watch them ALL the way through. Also listen to music ALL the way through. Don’t let bad language or inappropriate content surprise you in front of the students! There are likely to be repercussions if you do make this mistake. How do you spend your lunchtimes? Do you support any lunchtime clubs? Do you work with struggling students doing their homework? Perhaps you spend lunchtimes with the football team. Whatever you do, remember to
What do you do straight after school? Do you rush off home? Or do you stay until the site manager kicks you out? I would advise somewhere in between. Often there will be meetings after school, and you will probably have your training sessions at least one day after the students have gone home. You may also decide to support one or more of the extra-curricular clubs that the school run. This is excellent practice – as long as you plan for it, and make sure you leave enough time for the rest of your planning and preparation. After school is usually the time where staff can find each other to discuss things. If you have rushed off you will miss this informal planning and learning time. When do you do your reflections and assignments? It is really important to plan time to complete tasks, to make time for yourself, and to catch up with yourself before the next week. This means you have a fall-back position for whenever events occur which may surprise you or knock your scheduling for a while. Use the horizontal planning blog as a possible way forward to help you plan your time effectively. A typical scenario for you... which would you prefer?Imagine the following:
These may have the potential to spoil your day – but not if you have planned carefully and have routines to support you. Is this you? 1. You have planned your lesson carefully, and because you have arrived in school with plenty of time to spare, there is time to seek out your head of department to check your lesson with him/her and ask if there is someone in the department who can come in and support you. 2. You copied your resources yesterday. 3. You were planning to show a you-tube clip, but as you have time (due to your early arrival at school) you can change this part of your lesson by extending the writing task. Or is this you? 1. You rush in with 5 minutes to spare. No time to see what the alternative arrangements may be, so when a teacher you don’t really know is sent to ‘cover’ you, you are thrown and make some silly mistakes – this doesn’t help your confidence! 2. You only planned your lesson last night, so were hoping to copy the resources during the 5 minutes before the lesson starts 3. You only discover the internet is down when you try to load the clip – in front of the whole class. Of course they are all calling out their suggestions to make it work – ‘have you turned it on, sir?’… I know which I prefer! Coming up next time: Routines for your students  My 'quick read' blogs...Sometimes it is not possible - or appropriate - to write briefly about a topic. Indeed many of the aspects of pedagogy that we need to explore are complex and multi-faceted. Occasionally though I will post a 'quick-read' blog! These may be in the form of a summary or a set of top tips - and can highlight topics you may want to spend longer evaluating at a later date. Good for busy teachers! This quick-read looks at How to keep on top of:
How to keep on top of this term1. Give yourself some clear routines (both in and out of the classroom). It is important for the students to know what to expect when they come into your classroom. For example do you expect them to get out their equipment and put it onto the desk as soon as they arrive, so they are ready to learn? Similarly, you should have your own routines - for example, do you arrive 30 minutes early to school so you can set up your classroom in advance of the students arriving? 2. Know the students’ names. By this stage you should know most of the names of students in your class. This helps to develop a good working atmosphere in the room and makes life much easier! 3. Praise and acknowledgement go a long way. Try not to find yourself constantly telling students off for some misdemeanour or other. Remember those who are waiting patiently to learn, and those who are always attentive and willing. Let them know you have seen how hard they are working! 4. Maintain your expectations. Once you have shared these with the students, keep a robust stance. Don't give in because it may seem easier at this stage. In the long term, it will make things much harder to get back! 5. Keep asking questions - your mentor and head of department are the experts, and can advise you on most things! How to keep on top of lesson planningAsk yourself 3 questions:
1. Define clear learning outcomes – and share them with the students 2. Share your success criteria – what do they have to do to achieve? 3. How will you know what they’ve learnt? Have some good AfL strategies in place. 4. Keep a learning 'menu' of tasks next to you, so you can refer to it during the lesson, and make sure you cover everything you had planned. 5. Keep time at the end to check their learning - a good plenary helps to embed their learning How to keep on top of behaviour1. Plan for positive behaviour for learning. 2. Have clearly defined expectations – and follow up on sanctions where necessary. 3. Stick to your guns – if they are not behaving as you expect, do something about it. 4. Ask for help from your mentor and head of department when needed! 5. Always acknowledge good behaviour. I know that this is what is expected, but we all like someone to tell us we are doing it right! How to keep on top of managing your time1. Keep lists – plan horizontally where possible 2. Start a diary if you do not already have one! 3. Put in all the meetings and deadlines (such as reports and exams) across the year - don’t let anything be a surprise 4. Keep notes every time you are given a task – put it in your diary/on your list 5. Plan catch-up times – once a week set aside an hour for catching up on your lists and re-writing where needed How to keep on top of your work-life balance1. Learn to say no. 2. Structure your time carefully - use your diary! 3. Choose one day of the week / weekend which is for you. This could be time spent watching TV, or being with your partner or friends – but keep it clear of other things. 4. Be honest with yourself – if you are struggling to keep up, then be prepared to miss out on an evening out if you have to. It does happen unfortunately! 5. Eat and sleep properly! Don’t allow your new work behaviours take over from common sense! Coming up... Do you dream of calmer, more structured days? All you need are routines.
The next blog posts are all about how routines for you and routines for your students will lead to a calmer time all round!  Time management – or How to Become More OrganisedThere are so many new elements to becoming a teacher. When you envisaged your new responsibility how many of you thought beyond planning and delivering lessons? Suddenly your whole life revolves around bells and your day is divided into hourly slots. You are expected to be present at meetings, reflective during observations, inspirational during lesson delivery and creative during lesson planning! Alongside this, you need to mark work, write assignments, evaluate lessons and gather evidence for your portfolios! Some of you may find this water off a duck’s back; but some of you may be the proverbial swan – gliding on the surface, but frantically paddling for survival under the water. If you fit into the latter category, you need to develop a new skill which you may not have considered as being as important as all the others you are learning – how to be organised. Although written with the trainee in mind - these tips are for all busy teachers!When I first started teaching, I remember someone coming in to deliver a session on time management. He gave me probably the two most important tips of my career. And I still use them to this day.
1. Plan horizontally
You will probably be adding to this list several times each day, making it longer and longer! As more things are added, you may find you can't complete some of the smaller items - and you may miss deadlines or forget to go somewhere important! Motivationally and emotionally this is not a good place to be. You need to manage your lists so that you are not constantly feeling like you are failing to achieve! This is where the horizontal planning comes in. There are many ways to do this, and you need to find your own style, but I will explain the ethos behind horizontal planning and you can take it from there. Firstly you need to be able to prioritise each task, which you can only do by noting deadlines. Look at the example below which has taken the original list and added two additional columns.
One of my colleagues used to write her list on an A4 page which she had divided into days of the week. This was not just for the deadlines but more importantly for the tasks themselves. See the example below. In red are those personal arrangements you have that stop you being able to work on certain evenings. So in the example below, anything needed to be completed by Wednesday will need to be done on Monday! This will help you maintain a work-life balance for most of the time. The blue comments are those which remind you when you have longer periods to work – Wednesday looks like a good day for getting meaty tasks done. (Although be prepared for other things to crop up so don’t leave things to the last minute!) In the example, Thursday is not a good day to complete tasks – so accept that and don’t fret about what you can't do! 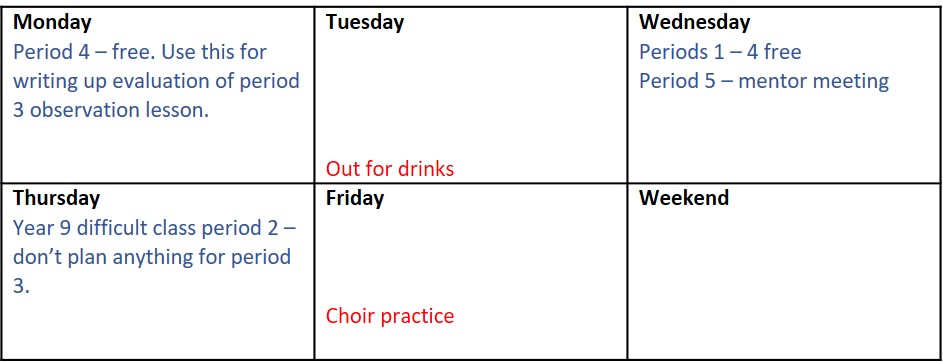 Once you have plotted your week, you can then add when you will do certain tasks on your list. As each task arises, put it into the diary on a day when you are more likely to be able to achieve it! If you find you have no time in a given week - see if you can negotiate completing the task the following week instead. 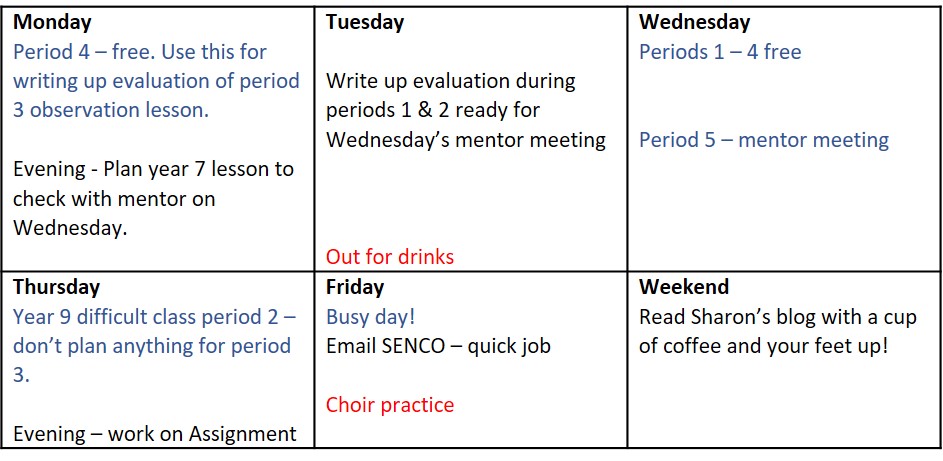
Read on for 2 - Only carry what you can do!
 What is a scaffold?Scaffolding is a way to ensure the tasks are suitable for all abilities. Whereas many higher ability students may be able to makes sense of an instruction, and instinctively understand what they need to do, there are also students who may not have this natural aptitude. I have taken two examples of poorly described tasks, and shown how you can make them more accessible for all students by scaffolding them. This post is mainly about the less able - there will be a future post on stretching the more able. For some students the moment they read instructions they begin to feel anxious. So you need to make sure all the expectations are clear. I cannot begin to tell you the number of frustrated parents who complain about homework because their child could not remember the detail given in the lesson, and the written instructions were too vague! The suggested scaffolds below help the students through their visual structure. Once you have understood the processes outlined below, you should be able to plan your own resources with this support in mind. Example 1The words… For homework I want you to keep a diary of all you eat for two days. Bring your homework to the next lesson and we can discuss whether your choice of food is healthy of not. The problem... What are you expecting from the students? To include main meals only? Snacks? Supper? Do you want this in a list? A paragraph? An extended prose? With this instruction, you may find that your students all do something different, so when you get the homework in, they may not all have met your success criteria! It is not clear what you actually want. Here is an example of how you could scaffold this task to ensure they really understand what is expected. The writing frame contains an example, which means that less able students know what it should look like. So you have three different ways of presenting this task: words only; writing frame without example; writing frame with example. 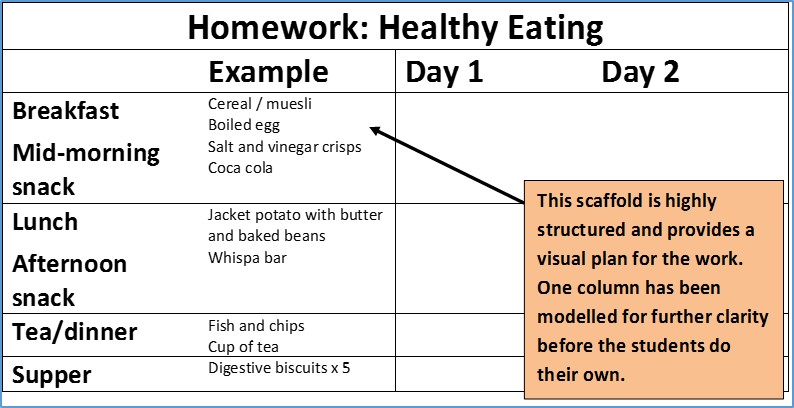 Example 2The words… You have to plan and write a report on ‘healthy living’ and I want you to include sections on diet, exercise, drugs and lifestyle. The problem… What information are you expecting them to include? How can they best organise this information before writing it as a report? A possible scaffold here would be a chart for them to complete to ensure they have all the information they need before starting the report. The lower ability students would find this chart useful. For the more able students you may give them a bullet point list instead of a structured frame. Be mindful that on its own the scaffold below would not be enough for the task described: the expectation of completing a report has its own issues - do they know what a good report should look like? However you can see how the structure becomes much clearer to the students than the original instruction suggested. 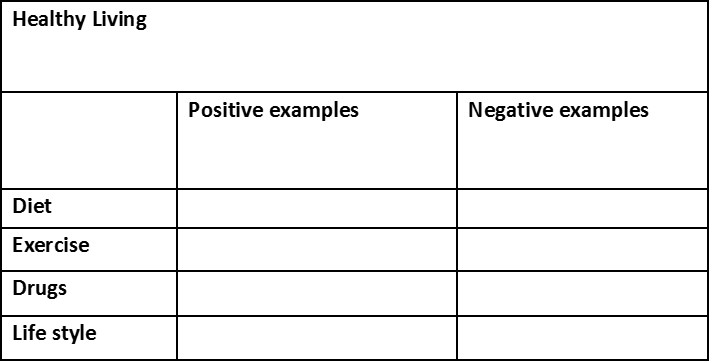 The intention of this post is to help your awareness of how you can change tasks to provide more or less support depending on the class you are teaching. As I mentioned in the earlier post on differentiation, you need to know your students well, so you can adapt your materials to suit. Evidence for your portfolio1. You can start by analysing some of the materials / resources you or your mentor have created and try to adapt these for the less or more able student. Include them in your portfolio with a reflective commentary to link them to the relevant standards.
2. If you are in a position to deliver the materials as part of a lesson, then your evidence could include: Resources (annotated to explain how you have adapted them) Lesson plan Observation notes from your mentor Your own reflection and possible improvements We all learn in different ways, and from different starting points.
You do not need to plan a different lesson for 30 students! But you do need to be aware of what the differences are, so that you can ensure ‘progress for all’ (Ofsted ‘speak’!) Consider what national research has found:
There are a variety of ways you can differentiate for your students:
2. You may differentiate through task. This means setting slightly different tasks, based on ability. You could do this through
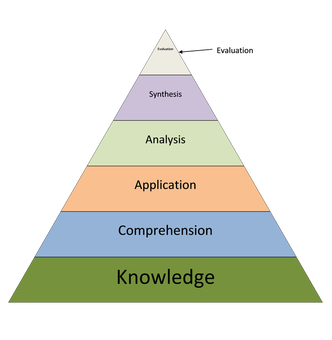
Have a look at the Bloom's Taxonomy diagram below.
3. Target your questioning so you are stretching, challenging and supporting depending on who you ask your questions to. Questioning is one of the most successful ways to ensure all students are stretched. (Later blog posts on questioning).
Consider the different types of learner you may have (even in ‘sets’!):
Additional activities to support the lower ability students may include:
Think also about differentiating your learning outcomes.This doesn’t mean that the students will be learning different things – but that they will be achieving different levels of expertise.
Take one of your lesson plans, and re-think your learning outcomes with this in mind. Reflect on this for portfolio evidence! Next week we will look further at scaffolding task instructions to support all learners.
Lesson planning 2 - Starters and plenaries - and why they are so important to the learning process10/5/2016
There is much discussion about the purpose of the starter
The answer is – any and all of the above! But whatever your aim, the following are definitely true
There are plenty of websites dedicated to examples of starters, but here are a few ideas to get you …started!Questions - ask the class some questions about a new topic to gauge their understanding and existing knowledge. Students are invited to ask questions which could be answered through the lesson (or through the unit of work) Three things they want to learn about a particular topic Three things they learnt last lesson Present information they have prepared for homework to a partner / another group / the class
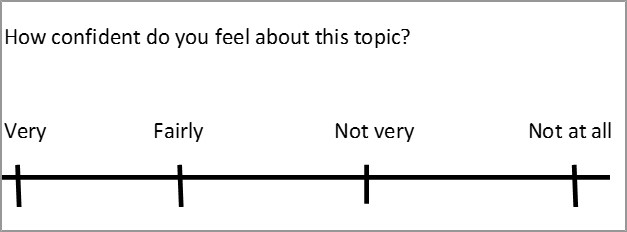
Equally as important as starters are the plenaries. The aim of the plenary is to determine the level of learning that has taken place. This should not be confused with the completion of the tasks. Just because a student has finished the work, it does not follow that they have learnt the information. Also don’t be fooled into thinking plenaries can only come at the end of the lesson! If you remember my post about AfL (assessment for learning) we talked about the need to check learning intermittently throughout the lesson. If you wait until the end it may be too late to discover that several students didn’t learn as much as you hoped! Wherever they are placed in the lesson, plenaries – or mid-lesson mini plenaries – are designed to check and reinforce learning. They work best when the students have a chance to articulate their learning. They are not as successful if you tell the students what they should have learnt, and ask them to agree they have learnt it! The act of articulating something you have learnt has the dual role of reinforcing that learning. Think about the times you have discussed a new idea with someone: the more you explore a topic, the more it makes sense to you as it makes stronger connections in your brain. Additionally, it will be more likely to move into your long-term memory though repeated examination. (This will be covered in a later post on Recall and Revision) Plenaries – like starters – are for ALL students. They will not be successful if you only engage with a handful of students. So although many plenaries take the form of question and answer – make sure you are involving ALL students in answering. There are several ways of doing this…Use mini-whiteboards – students all write down the answer / idea / draw the diagram… and all show you at the same time by holding the mini-whiteboards up. Traffic lights – students tell you how confident they feel in their newly acquired knowledge by holding up red (not confident); amber (quite happy but would like to go over it again) and green (got it!). You will need coloured cards for this, but it is worth making a set that you can use again and again. Write down three things you learnt. Write down three questions you still have about the topic. Complete a crossword on the topic. You could create this yourself, or set a task for the students to make one for homework - and use it as the starter next lesson by swapping with a partner!
Plenaries should be given the time they deserve – they are part of the learning process! Articulating learning helps to embed knowledge. Consequently, anything less than 15 minutes is not sufficient. As a new trainee, you will undoubtedly miscalculate the time your tasks will take – time management will be a target for many of you, for some time! And as a result the plenary is often the thing which gets left off. Obviously you cannot jump ahead to the plenary if you haven’t given the chance for the students to learn the topics, but perhaps you could have some speedy progress checks in hand that you can finish the lesson off with. This will help you to reflect with your mentor about the success of the lesson in terms of the progress made by the students.
Progress line – students mark where they are on the line at the start of the lesson, and again at the end... Progress checklist – you give the students a checklist of elements they will be learning in the lesson. They grade themselves red, amber or green at the start – and again at the end... Get the idea? Perhaps you can share some of your progress checking ideas with me through the comments box, and I will post them on a future blog. Next blog post Lesson planning 3 - Differentiation; what is it and how do I do it? Depending on what course you are following to achieve your QTS, you will all be at slightly different starting points. Don't worry - you will catch up very soon! Some of you will have had the opportunity to observe plenty of lessons and will have seen examples of how a good lesson should be planned. Some of you may have been studying the theory of lesson planning and how this should look in the classroom. Some of you may have even started to deliver part of a lesson, or even a whole lesson. Certainly by Christmas, you will all be planning lessons and delivering them to one or more year groups in at least one key stage!
|
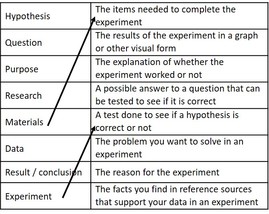
 | The most important part of designing your learning intentions is that the students need to know what they are too. It is all very well deciding what you want them to learn and then just delivering the lesson...but if the students aren't included in this knowledge you will be missing a large learning opportunity! |
|  |
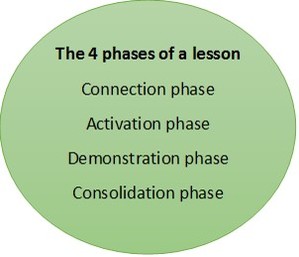 | Connect – lesson outcomes are described and connections are made to prior learning or existing experiences. Activate – students make sense of the knowledge through specific activities. This is the bulk of the lesson to enable the students to engage in the learning. Demonstrate – the students can now demonstrate their new knowledge. They have learnt something and are expected to apply that knowledge. Consolidate – also known as the review or plenary. Students articulate what they have learnt and how they have learnt it. |
 | There are two ways we can check students have learnt something: Assessment of learning and Assessment for learning. |  |
| You are building a wall, brick by brick |  |
 Only once it is secure can you build the next layer – you will be amazed at how far they can go if you give them the right tools! 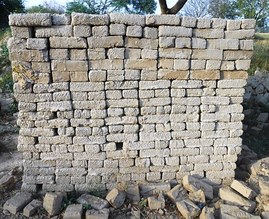 | You need to make sure that the bottom layer of bricks is secure before putting the next layer on top. 
|

 |
|
| In this post we will be touching on the new assessment expectations and why you should care about them. We would not expect you to be learning about assessment in depth this early on in your course. However, you will be aware – because most staff-room conversation will be about this – that there have been big changes to the assessment and measurement structures for schools. |  New GCSE grades? P8? A8? What?? |
Planning and delivery | At the moment in your lesson planning, you will mainly be focusing on what tasks you would like the students to carry out, and working hard on time management - hoping that you can fit all of your ideas into one lesson! However, it is worth having at the back of your mind – to bring to the front at a later stage – how each task you set helps the students to make progress. |
| | |
December 2016
November 2016
October 2016
September 2016
All
Assessment
Behaviour Management
Collaborative Group Work
Differentiation
Keeping On Top
Learning
Learning Talk
Lesson Planning
Progress
Questioning
Routines
Starters And Plenaries
Time Management
Video Observations: An Eye On Learning